
Administration GuideLast updated: 2026-07-29
SmartBackup Administrator Responsibilities
As a SmartBackup Administrator, you oversee critical data management tasks including user LiveCopy (online backups), ShadowCopy (offline backups), Refreshmembers, DRP Reports, and other operations such as Housekeeping Services and JobCentral RunBooks.
Your role includes configuring schedules, batch files, and automation tasks that dictate when these functions are executed and how job information is captured and how job notifications are configured.
You can leverage the new Housekeeping Services section and built-in scheduler to streamline and optimize your scheduling workflows, or you can create your own fully customizable backup scheduling plan using a tool like Windows Task Scheduler.
Overview
SmartBackup is a software application that is downloaded from the AcuWorkflow website and installed on a local Windows computer under the full security, control and management of the customer or the customer’s IT team. The software can be installed on a physical computer, or it can be installed on any Windows instance, including virtual machines on local or cloud-based servers and services such as AWS and Microsoft Azure.
All customer data is always under full control of the customer SmartBackup administrator, or IT team. This provides the highest possible security for customer data.
It is important to remember that when using the ShadowCopy offline backup function, you will be creating exported copies of potentially ALL your organization's Smartsheet sheets and data. This is why it is imperative that the server and disk location used for SmartBackup is secured correctly.
SmartBackup includes the following key functional areas:
- A - Each user's Smartsheet area; including Home, Workspaces, folders, and data.
- B - Each user's designated online backup Vault area.
- C - Your organization's designated external storage area for Export and ShadowCopy (offline backups).
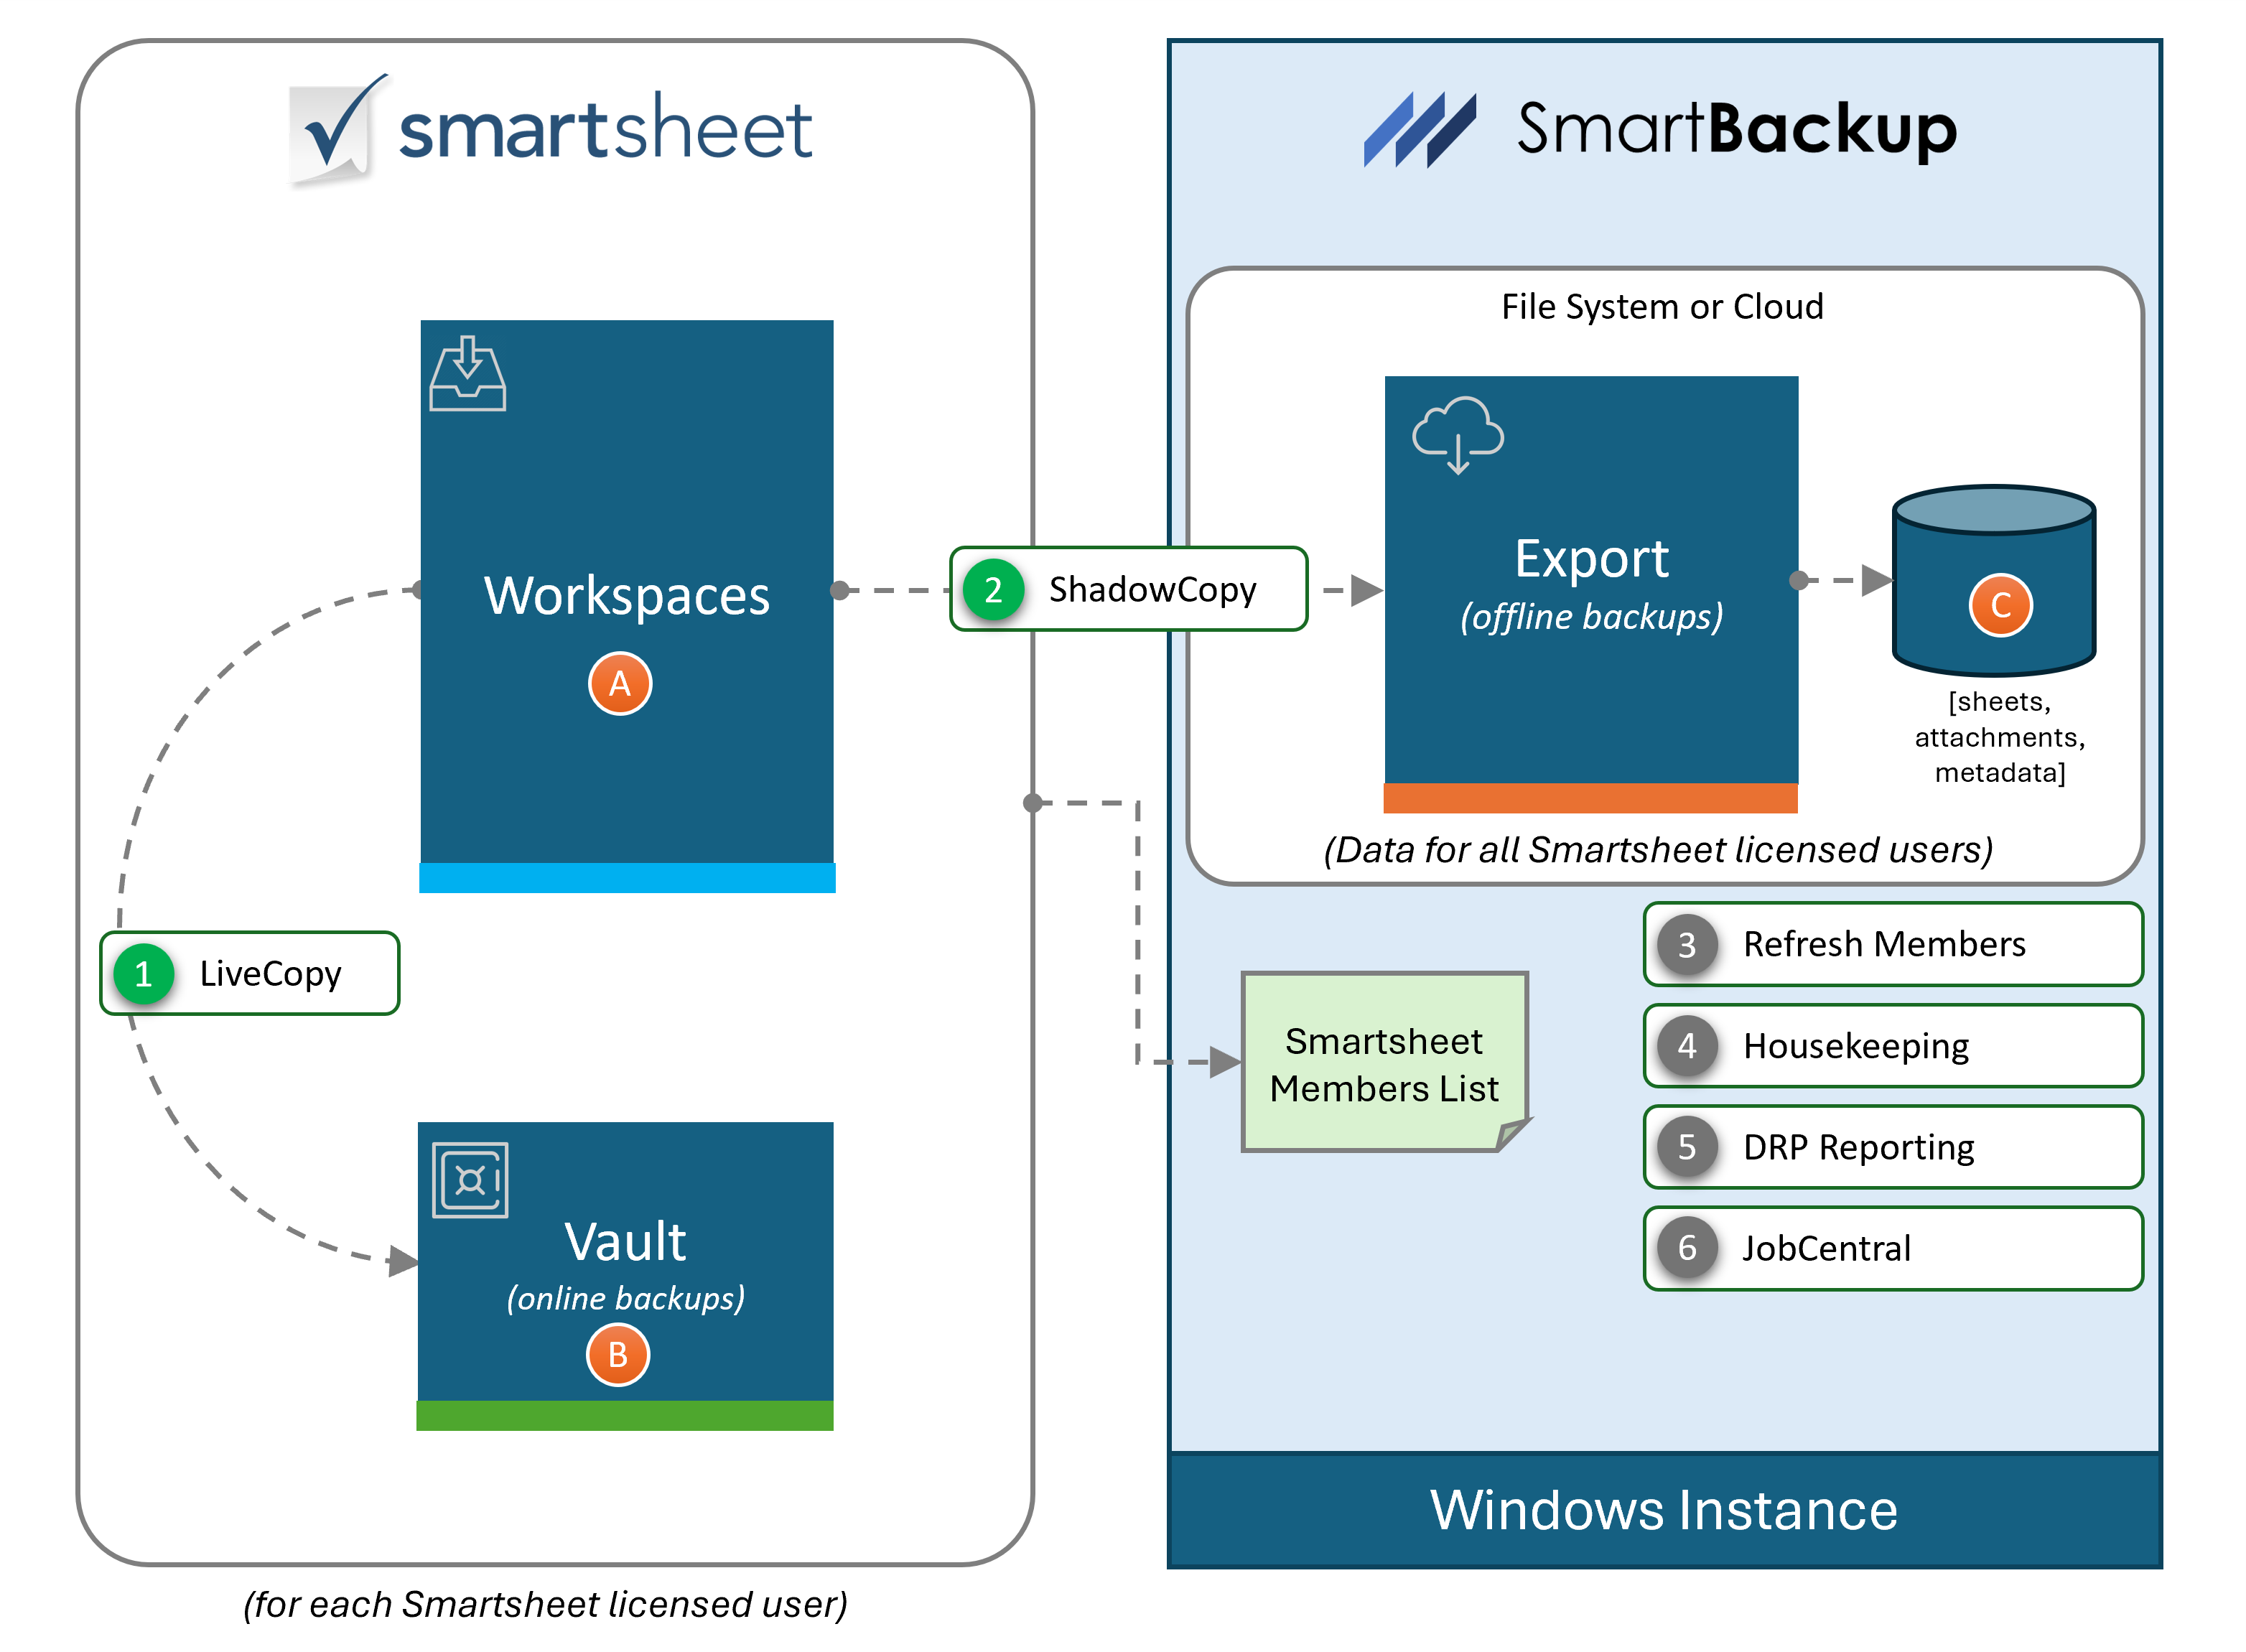
- LiveCopy - Obtains a list of all workspaces and assets in “A”, then decides what to backup based on what was recently modified and creates an online backup copy of those items in “B”, the Vault. At any time, a user can restore deleted or damaged data in “A” by copying the data from the most recent online backup copy in the vault, “B”. Older copies are automatically purged from the Vault over time to ensure that the Vault does not fill with old redundant copies.
- ShadowCopy – When it runs, the ShadowCopy function identifies Sheets that meet the job criteria, and it creates offline backup copies of those Sheets and Attachments, together with all available "metadata", and saves them to the designated Export area, “C” on the Windows instance.
- RefreshMembers - This function is designed to refresh the list of Members (or users) from Smartsheet. It can be run as a separate job, independently of other SmartBackup functions, ether by enabling it in Housekeeper Services or by scheduling it using Windows Task Scheduler. When it runs, Refreshmembers pulls a new list of all current Members from Smartsheet and updates the list in SmartBackup.
- Housekeeping Services - This is a new scheduling capability built directly into SmartBackup. It allows for SmartBackup Admins to easily select key functions to run on a set schedule. When a function is enabled, the associated function or RunBook will run at the specified day and time. Note that the SmartBackup Console must be active in order for Housekeeping Services schedules to run.
- DRP Reporting - This is another new function incorporated into SmartBackup. It is designed to generate a set of reports that can be used to support audit trail and recovery efforts. These reports currently include a Groups Report - which contains a list of all the groups, a Group Members Report - which contains a list of groups and associated members, and a Users Report - which contains a list of all the Users at the time the report ran.
- JobCentral - This is the new basis for all SmartBackup Reporting and Notifications going forward. JobCentral is a standalone function that can be scheduled like all other SmartBackup functions. When called, it takes provided job information and saves that information to a designated Workspace/Sheet in Smartsheet. That Sheet can then be used to feed into Reports, Widgets, and a Dashboard to provide SmartBackup Admins with a comprehensive and fully customizable Status and Reporting solution for SmartBackup and any other service. All alerts, notifications, and status emails are then generated by Smartsheet - and can be configured as needed.
Making sense of the different operations:
| LiveCopy (Online Backup) | ShadowCopy (Offline backup) |
|---|---|
|
Creates exact copies of source sheets, dashboards, or reports and saves them to the Vault workspace for each user. This ensures that all Smartsheet settings and formats are preserved. These online copies are the "highest fidelity" copies possible within Smartsheet, and because they are saved in each User's Smartsheet account, it is very easy for users to find the most recent backup copy and to restore deleted or damaged data simply by copying from the backup copy and saving to the live sheet. The vault contains a folder for each Year/Month with each containing the online backup copies. The SmartBackup Admin can specify how many Year/Month folders to keep in the Vault, and older folders are automatically purged (deleted) from the Vault, to maintain the size of the Vault over time. |
Creates offline copies of source sheets and reports that meet the specified criteria. These offline copies are saved to the designated file store, which can be a local drive on the SmartBackup server instance, or it can be a mapped drive, including cloud-based locations. The offline backups include the basic sheet and report data in Excel format together with all available metadata from the original sheets and reports. If Attachments were included, those will be saved together with the sheet data in the same folder, and the file names will include both the SheetID and the AttachmentID. It is ideal for creating snapshot copies, or to create external copies of the data for disaster recovery planning, or business continuity purposes. |
When can each SmartBackup Function be run?
All SmartBackup functions (LiveCopy, ShadowCopy, Refreshmembers, DRP Reporting) can be run on-demand at any time or based on a regular schedule. Your specific environment will dictate the ideal backup scheduling arrangement, but in general, we recommend starting with the following:
- Online backups: schedule to run LiveCopy incremental using “-d=3” every day.
- Offline backups: schedule to run ShadowCopy using “-d=3 -s -a” every day.
In addition to scheduling these key functions, it is also important to schedule other housekeeping functions using the Housekeeping Services settings. These include:
- Refresh Member list
- Run DRP Reporting
While all the above functions can be run from the Console, they can also be scheduled to run at any time using scheduling tools like Windows Task Scheduler. In that case, each function can be invoked directly by running the relevant .exe file. However, it is highly recommended to instead configure batch files to run each function. These RunBook batch files provide additional capabilities such as initialization steps, notifications, and error handling, which greatly improve the visibility and administrative insights.
When used together with the new JobCentral function, in addition to running each function, RunBooks can also do pre-processing, error checking, and post-processing - and most importantly, can also call the JobCentral function, which then feeds all job information to the JobCentral Sheet in Smartsheet - for further summarization, automation, alerting, and notifications.
Running SmartBackup
All SmartBackup functions can be invoked manually, on-demand, or they can be scheduled to run at any time. This includes the following:
| When | Typical Actions |
|---|---|
|
On-demand - console |
SmartBackup console – launch SmartBackup on the server/host computer, and go to the LiveCopy, ShadowCopy, or Housekeeping Services screens to run each function. |
|
On-demand – CMD |
Open a Windows Command Line Window (type CMD in the Windows search bar). Navigate to the SmartBackup apps installation folder. By default, this is C:\\SmartBackup\apps Now you can invoke any of the individual apps, such as:
When running be sure to also provide any required parameters. For example, to run LiveCopy including Sheets and Attachments for the past 5 days, type the following:
Then after pressing enter, the app will start running, and progress will be displayed in the CMD window. All functions can be run like this at any time. |
|
Scheduled - Housekeeping Services |
SmartBackup console – go to the Settings > Housekeeping Services section. Choose to enable or disable any of the available services – then select the relevant schedules and click the “Add new scheduled service” icon to activate. |
|
Scheduled – WTS |
All functions can also be scheduled to run automatically on any schedule using the Windows Task Scheduler (WTS) built into Windows. Follow the CMD option described above to schedule each function as needed. Refer to the WTS guide later in this documentation for details. |
|
Scheduled – WTS and RunBooks |
As above, all functions can also be scheduled to run using a combination of WTS and RunBook batch files. The advantage of using the RunBook approach is that you can add additional steps such as initialization, pre-processing, error processing, and post-processing to the batch file, and you can also add notifications for each step. RunBooks are also required when using the JobCentral function. Refer to the JobCentral and RunBooks sections in the documentation for more details. |
Checklist
Before any process can run properly, you should:
- Install SmartBackup, see Installation Guide.
- Obtain a license, see Licenses.
- Obtain a valid Smartsheet sysAdmin API Token.
- Optionally configure your Proxy Server or similar software.
- Configure SmartBackup, see Setup Guide.
- Setup your Member Vaults via the auto provision process.
- Setup and configure JobCentral.
- Setup and customize your set of RunBook batch files.
Managing Licenses
You will need to have an active SmartBackup annual subscription in order to successfully run any SmartBackup functions. Contact the AcuWorkflow team for pricing and subscription information.
Obtaining an API Token
This section describes generating a SysAdmin API token for the integration of Smartsheet into SmartBackup.
User API Tokens and sysAdminAPI Tokens are similar, sysadmin tokens can only be generated by a user with Smartsheet Admin rights.
SysAdmin API Token
To generate or re-generate a SysAdmin API Token follow these steps:
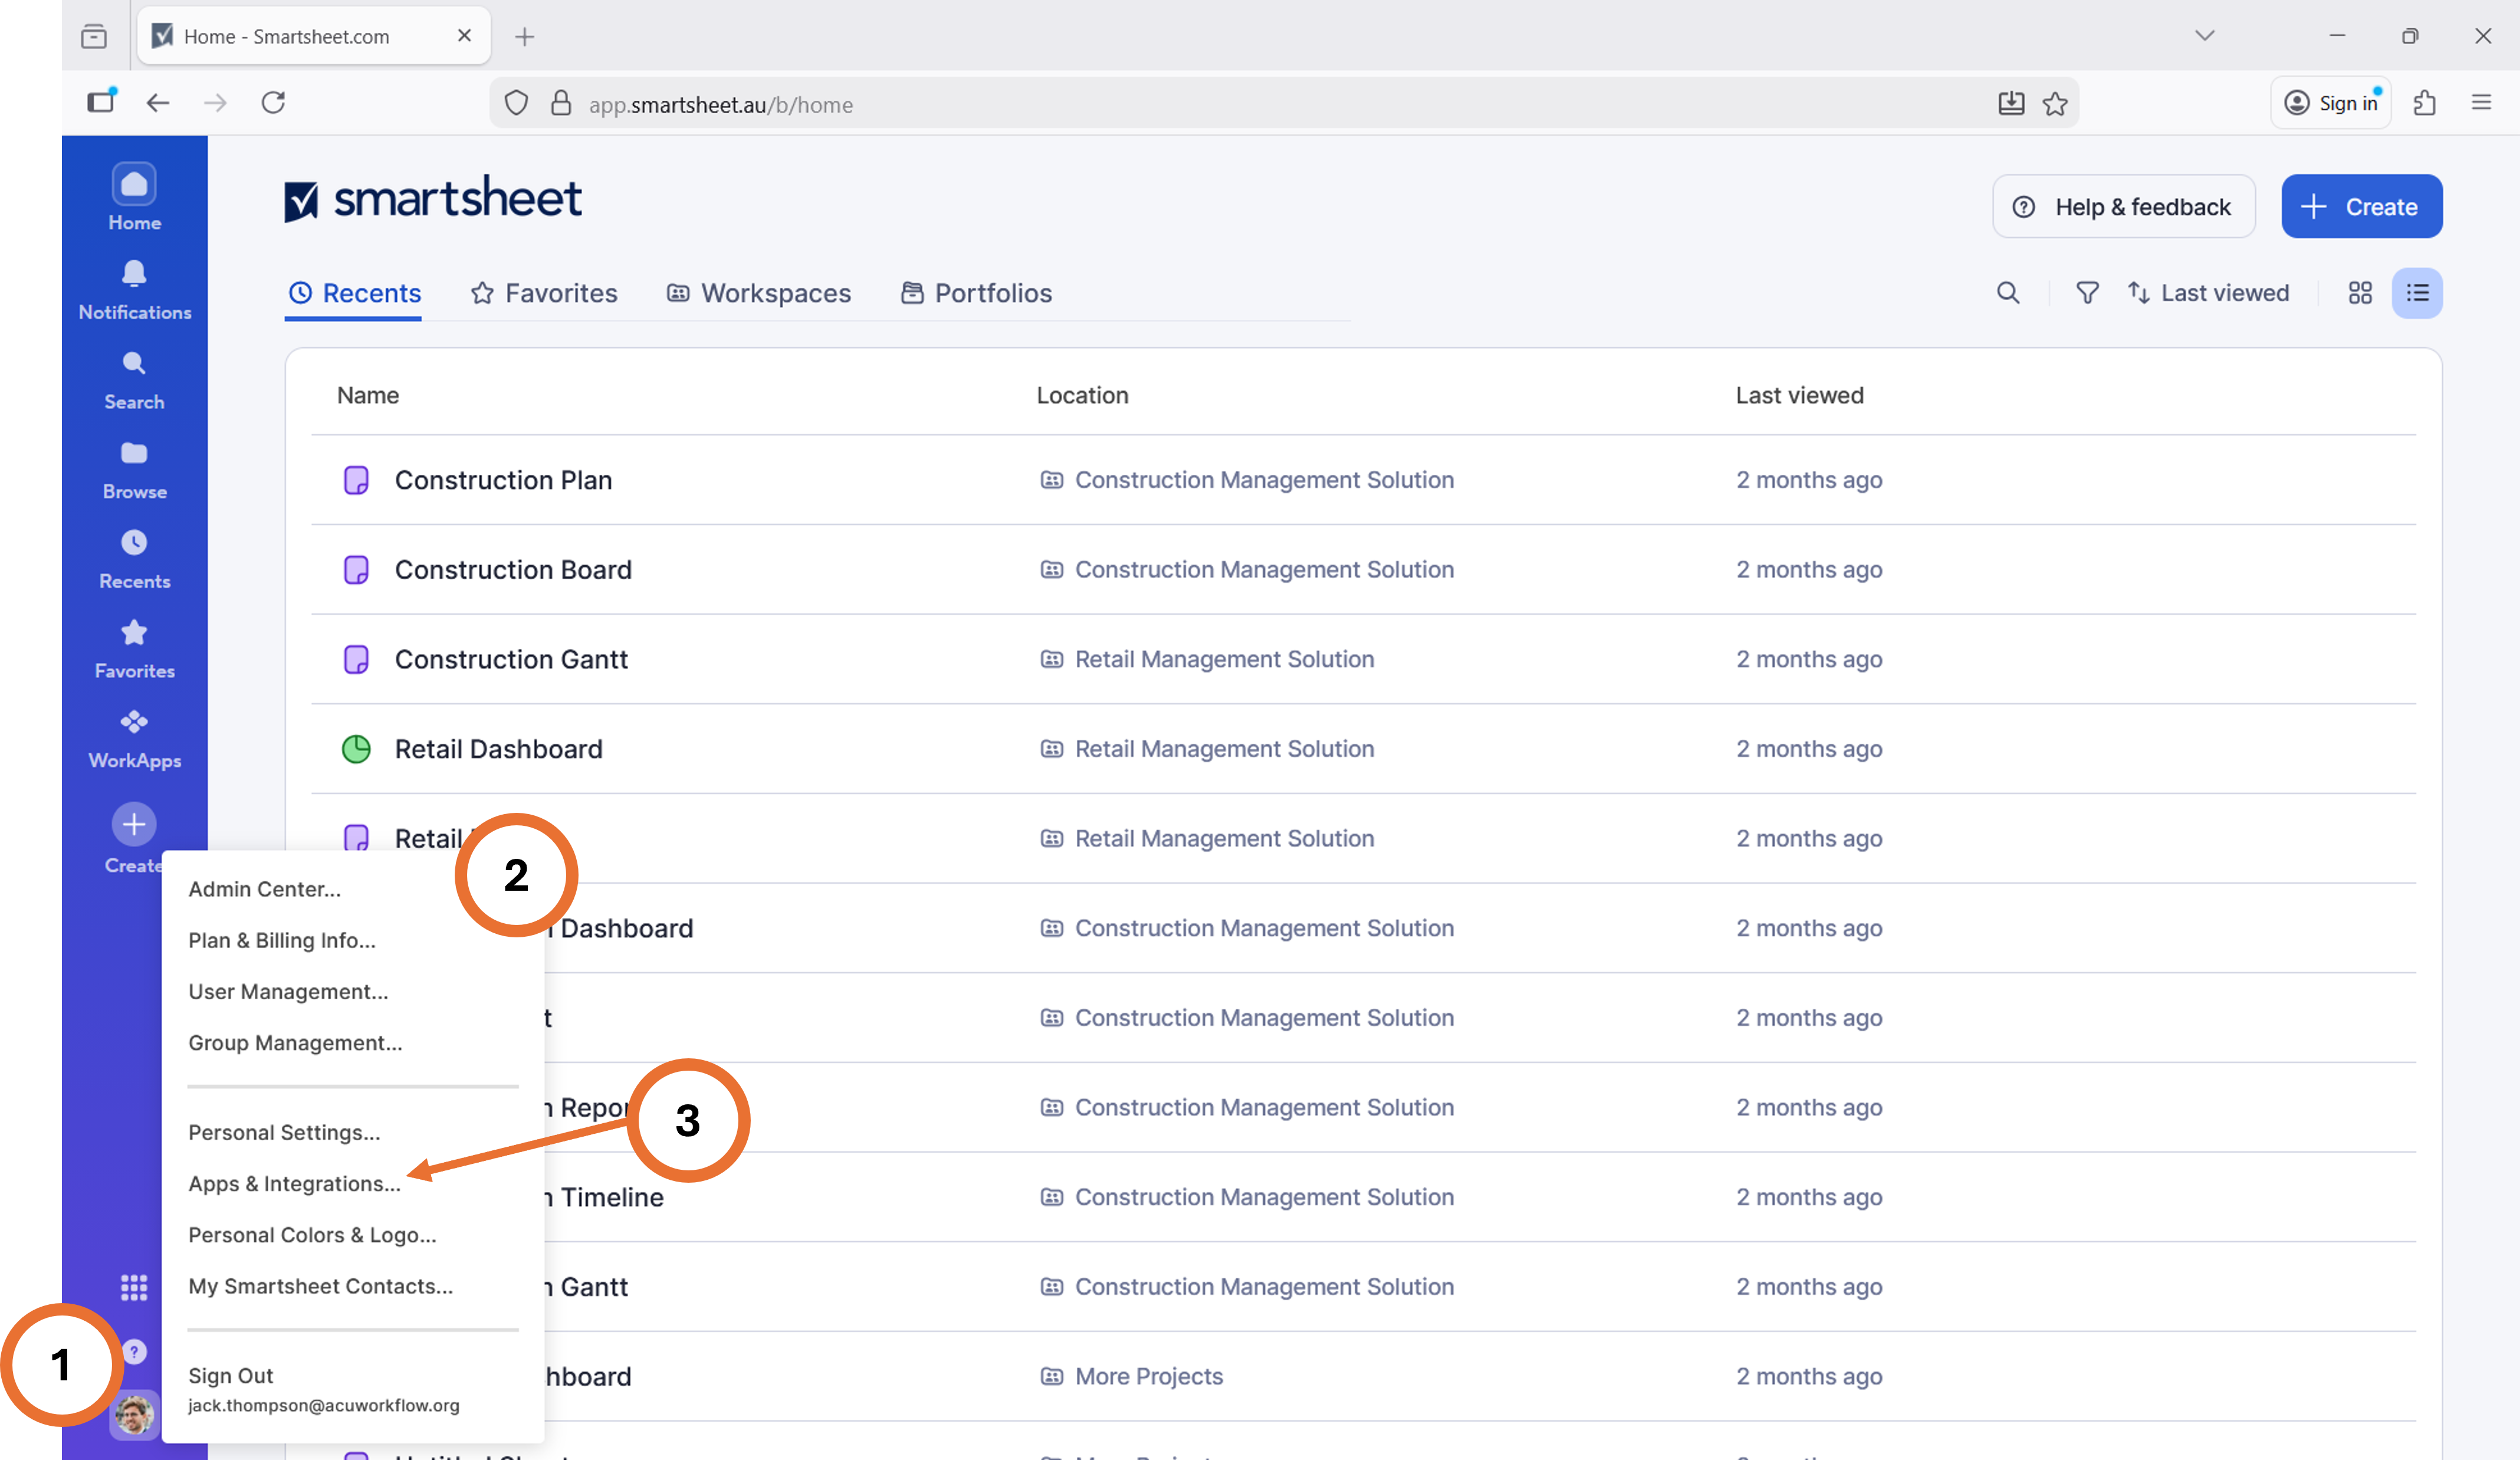
- Log into Smartsheet with an account that has Smartsheet Admin rights, then click on Profile button, usually bottom left.
- Confirm that you can see the “Admin” section at the top of the list. This will indicate that you have sysadmin rights.
- Next click on “Apps and Integrations" which will display the Personal Settings Form.
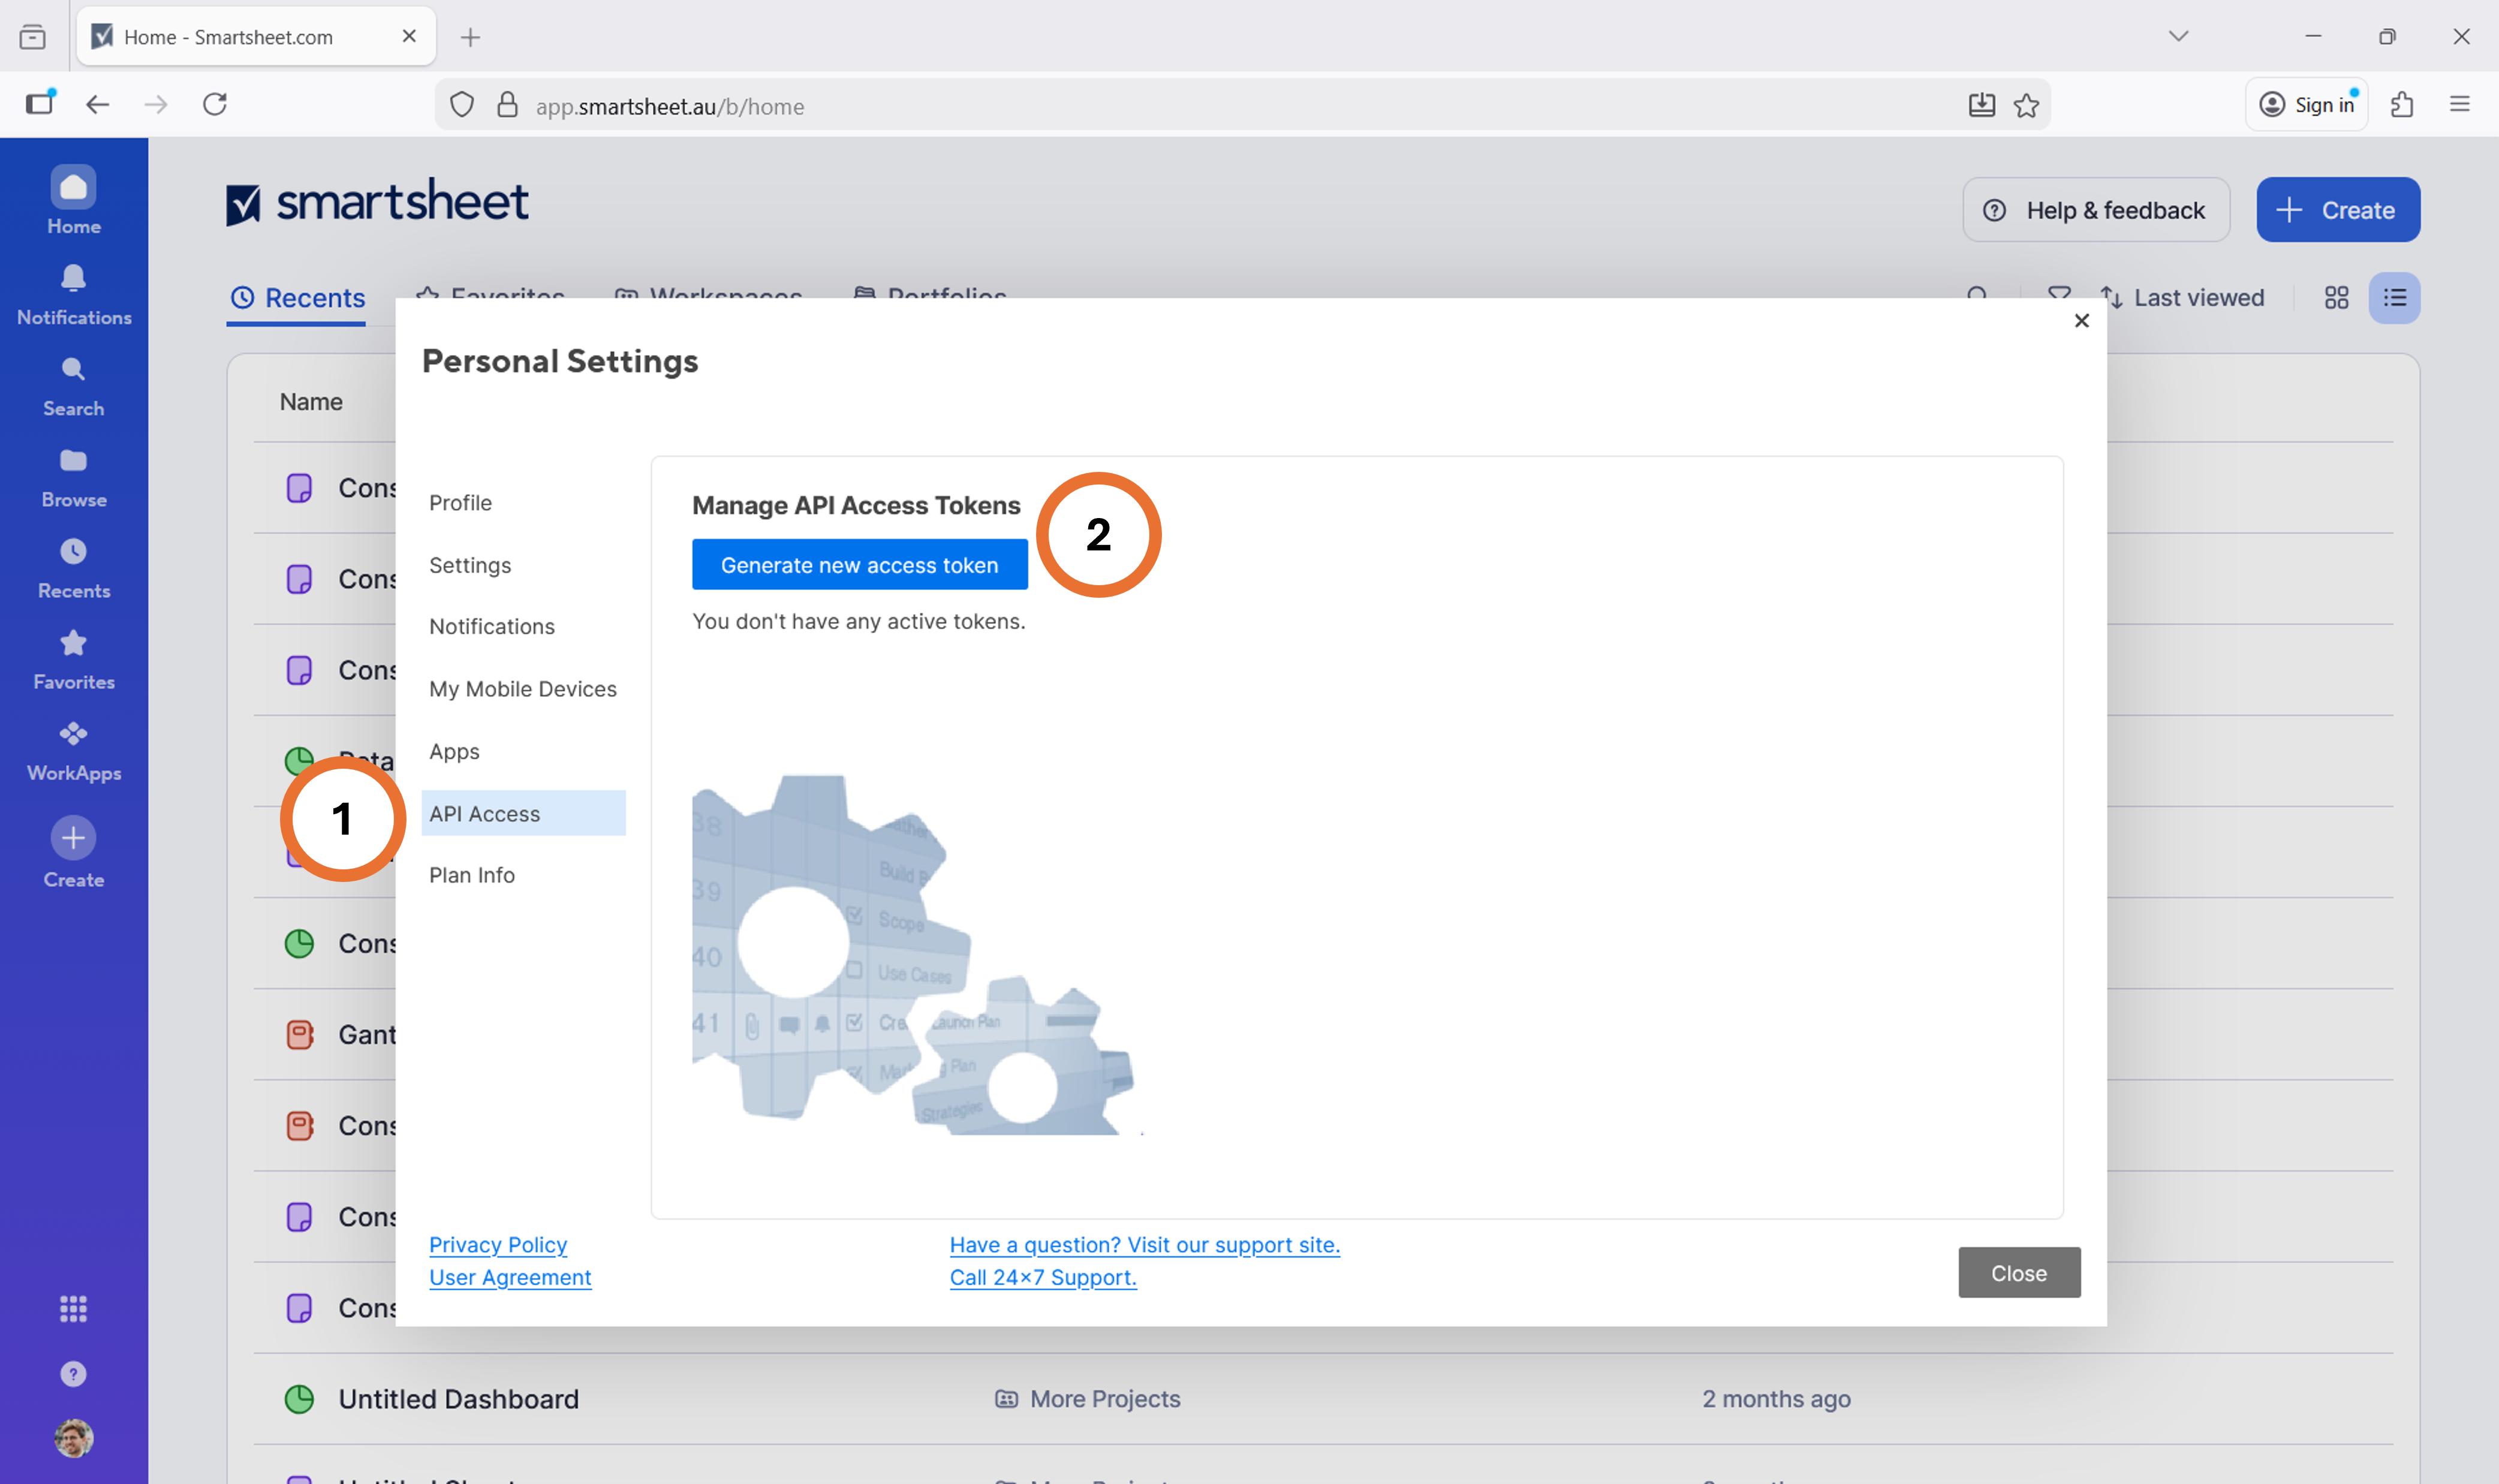
- Click "API Access" which will allow you to Manage your API Tokens.
- Click "Generate new access token" which will provide you with the SysAdmin API Token
- IMPORTANT: This is the only time that the full token is displayed. Be sure to make a copy and save the token using a tool like Notepad and save it in a secure location for future reference.
Bypass Proxy Server
Should you deploy SmartBackup in an environment where cloud API calls are controlled with a Proxy server like Forcepoint, you must create rules on the Proxy Server to bypass the following domain calls:
- license.acuworkflow.com
- smartsheet.com
- api.smartsheet.com [for North America Smartsheet accounts]
- api.smartsheet.eu [for European Smartsheet accounts]
- api.smartsheet.au [for Australia Smartsheet accounts]
- api.smartsheetgov.com [for US GOV accounts]
Proxy Server condition is typically observed when SmartBackup abends or displays "API Token or VaultID incorrect" even though you know you have supplied the right information. Again, it is because SmartBackup is trying to make API calls to Smartsheet and the Proxy Server prevents outbound API calls.
Configure Settings
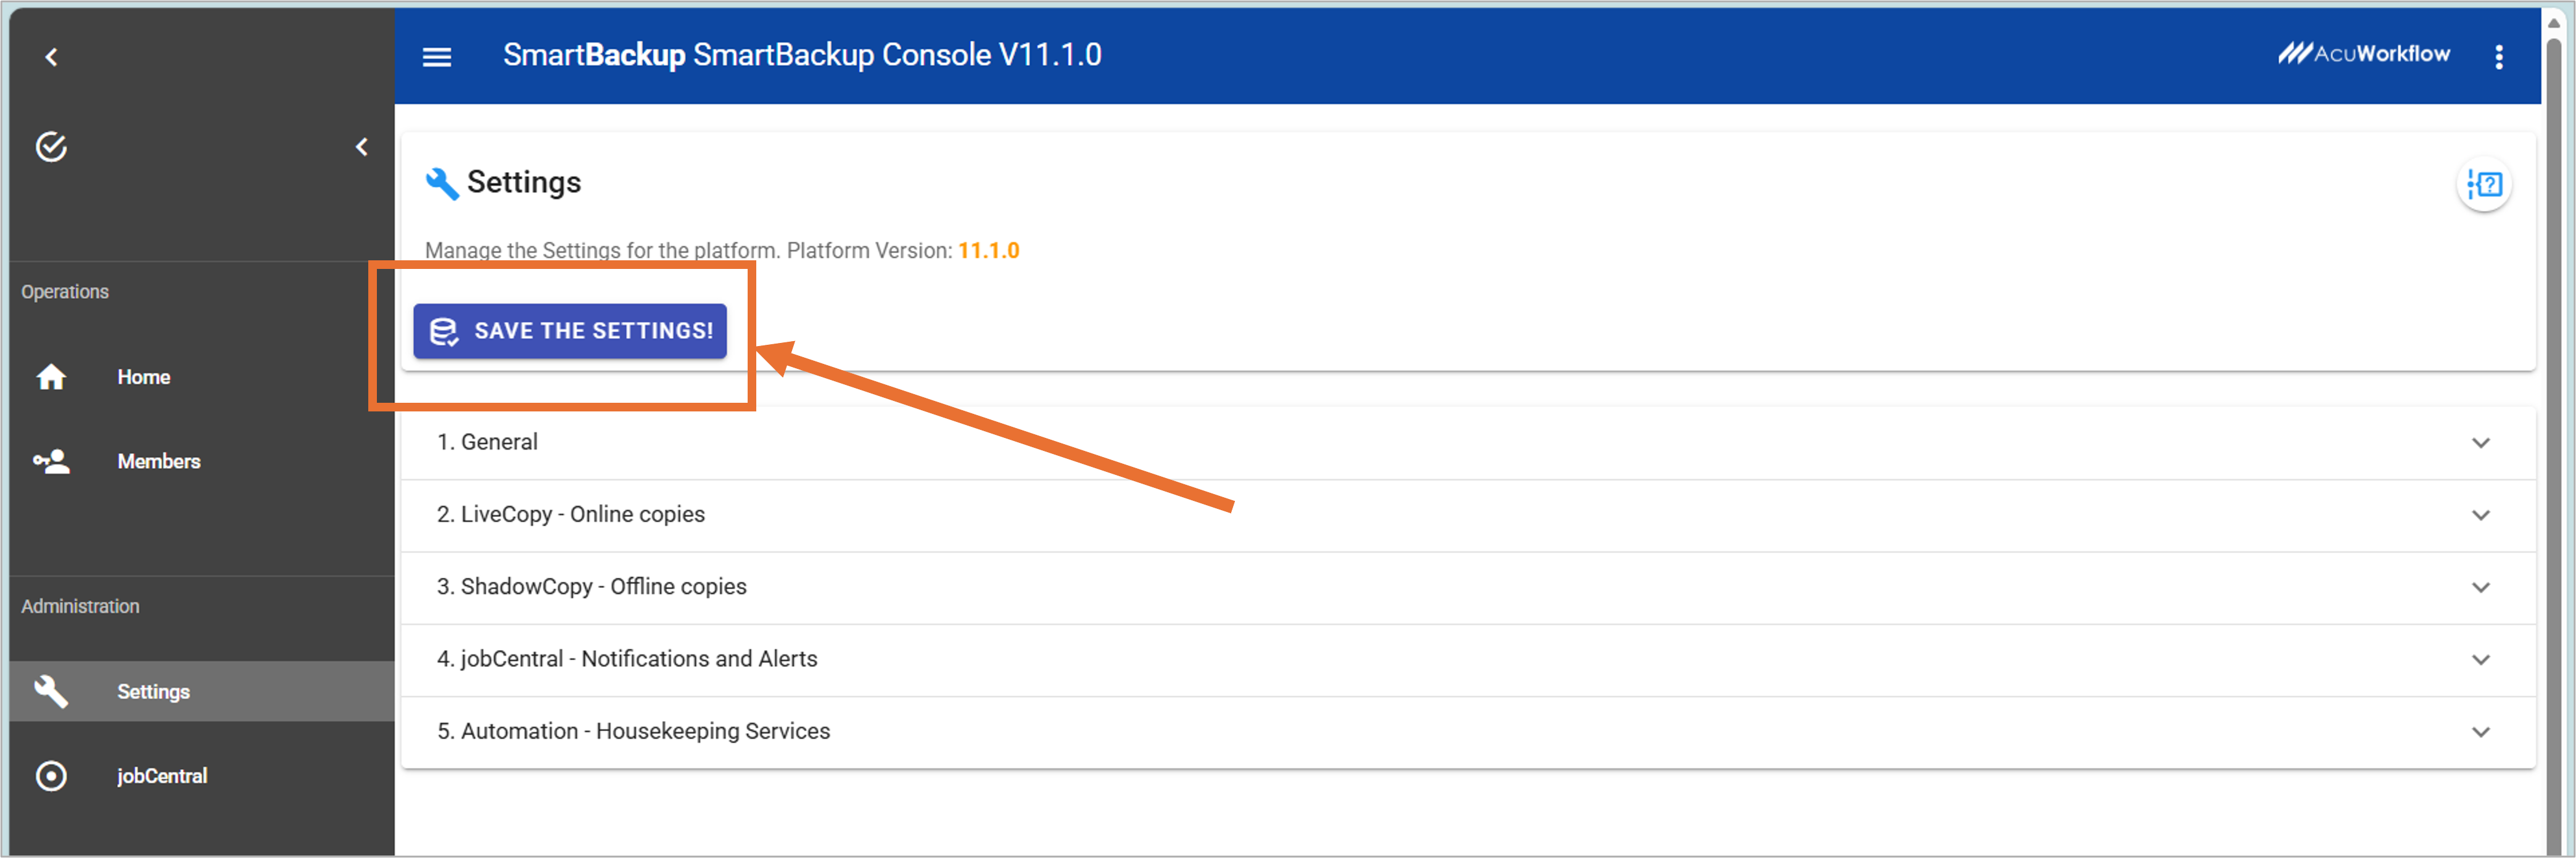
SmartBackup Administrators can further customize the platform by editing the config.yml file or by using Settings in the Console.
Settings
Please ensure when using the Console that you click on SAVE THE SETTINGS to affect any changes.
| Options | Option-Name | Option-Description | Default |
|---|---|---|---|
| 1. GENERAL | |||
| 1.1 | Smartsheet Region |
Select the Smartsheet Region that your organization is hosted in using the dropdown list. The list currently includes US, EU, AU and GOV. Note: US = North America, EU = European Union, AU = Australia, GOV = US Gov accounts. |
US |
| 1.2 | Smartsheet User Subscription Model |
Select the Smartsheet licensing model appropriate for your organization's Smartsheet account. Options are OFF = Legacy Collaborator Model, ON = New User Subscription Model. |
OFF |
| 2. LIVECOPY | |||
| 2.1 | When off, do not include any attachments. | When this switch is off, then attachments will not be included for LiveCopy operations. Switch to "On" if you would like to include attachments in the LiveCopy operations. | OFF |
| 2.2 | Add SheetID | If turned ON, SmartBackup will add the SheetID to the file name of the online backup copies in the vault. | OFF |
| 2.3 | Create User Backup Vaults | Click this button to generate or refresh the Backup Vaults for all Active and Enabled Members in the Member list. | |
| 2.4 | Remove User Backup Vaults | Click this button to remove existing User Backup Vaults for all Active and Enabled users in the Member list. Note that this will also delete all backup copies in those Vaults. | |
| 3. SHADOWCOPY | |||
| 3.1 | When off, do not export attachments | With ShadowCopy you have the option to export sheets or attachments or both, depending on the overall workload. If you have users with many sheets but not many attachments, then consider exporting both together, but if you have users with sheets that contain many attachments, then consider running them separately (as separate jobs). You may also consider separating those "power" users into their own queues so that they can be processed independently of other users. | OFF |
| 3.2 | Soft limit | For ShadowCopy, when including Attachments, you also have the option of setting a limit on the number of attachments that will be included for each sheet. This improves overall performance and stability, while also including the most recently changed attachments. | Zero |
| 3.3 | Path where offline backup copies are saved | This field specifies where the offline backup copies will be stored. Typically, this will be the "C:" drive of the Windows instance where SmartBackup is installed, but this location can be changed to any location as long as it is a valid "mapped drive", or UNC path. | c:\smartbackup\user\exports\ |
| 4. NOTIFICATIONS & ALERTS | |||
| 4.1 | We want to monitor our jobs with JobCentral | If you have an existing Workspace and sheet defined, you can provide those details here and JobCentral will save the job information to that sheet. If you don't have a Workspace or Sheet, then JobCentral can create one for you. | |
| 4.2 | Use Existing | If you have an existing Workspace and Sheet that you would like to use for JobCentral, then provide those details here. Note that you will need to select a User account first, and that User account will be the overall owner of the JobCentral Workspace, including the JobCentral sheet, Reports, and Dashboards together with any associated automations, etc. Remember to click "Save the Settings" after you have entered the details. | |
| 4.3 | Define New | If you do not yet have a Workspace and Sheet that you would like to use for JobCentral, then you can use the Define New tab to generate and create a new Workspace and Sheet. Here again, you will need to specify which User account to use, and you can optionally edit the name of the Workspace and Sheet to be created, then click "Create New" to create. Remember to click "Save the Settings" when done. | |
| 5. HOUSE KEEPING SERVICES | |||
| 5.1 | Refresh SmartBackup with the latest list of Smartsheet users. | Choose the schedule that is most appropriate. Here you can also specify "what" to run. We recommend running a custom "RunBook" instead of the default, as that will give you the ability to track Refreshmembers jobs using JobCentral as well. | OFF (Note: this is the default method for running Refreshmembers. But it can also be called directly or scheduled via RunBook and WTS, as needed). |
| 5.2 | Run LiveCopy to create online backups of the most recently Sheets. | Choose the schedule that is most appropriate. Here you can also specify "what" to run. We recommend running the predefined "RunBook" which is called runlivecopy.bat |
OFF (Note: this is the default method for running LiveCopy. But it can also be called directly or scheduled via RunBook and WTS, as needed). |
| 5.3 | Run ShadowCopy to create offline backups of the most recently Sheets. | Choose the schedule that is most appropriate. Here you can also specify "what" to run. We recommend running the predefined "RunBook" which is called runshadowcopy.bat |
OFF (Note: this is the default method for running ShadowCopy. But it can also be called directly or scheduled via RunBook and WTS, as needed). |
| 5.4 | Generate DRP Reporting baseline. | Choose the schedule that is most appropriate. Here you can also specify "what" to run. We recommend running a custom "RunBook" instead of the default, as that will give you the ability to track DRP Reporting jobs using JobCentral as well. | OFF (Note: this is the default method for running DRP Reporting. But it can also be called directly or scheduled via RunBook and WTS, as needed). |
Auto Provision Users and Vaults
One of the unique features of SmartBackup is that it uses a sysadmin API Token to perform all actions on behalf of the customer’s Smartsheet account. This means that SmartBackup can download and maintain a list of all the Smartsheet users in the organization, and then it uses that Member list when running each of the functions.
During initial configuration, in the Settings section of the SmartBackup Console, open the “2. LiveCopy - Online Copies” section and you will find two large buttons: a green button called “Create User Backup Vaults” and an orange button called “Remove User Backup Vaults”.
Click on “Create User Backup Vaults” to setup the user vaults initially, and whenever you add or remove users to your Smartsheet account.
NEW Function: Refreshmembers. This new standalone app allows you to refresh the Member list at any time without first starting the SmartBackup Console. It also allows you to refresh the Member list on a scheduled basis via the command line, or Windows Task Scheduler. This means that you can schedule the Refreshmembers.exe to run before you run the other functions like Backup and ShadowCopy. This will ensure that you always have an updated member list. However, we strongly recommend creating a separate RunBook for RefreshMembers, so that when it runs, the job can be tracked using JobCentral.
Proxy Server condition is typically observed when SmartBackup abends or displays "API Token or VaultID incorrect" even though you know you have supplied the right information. Again, it is because SmartBackup is trying to make API calls to Smartsheet and the Proxy Server prevents outbound API calls.
Automatically provision online backup Vaults
Sysadmin mode allows you to automatically provision online backup Vaults for each user by using the "Generate Backup Vaults" function in the Settings > Backup section.
The standard name for a provisioned online backup Vault workspace is zz!~!-VAULT-do not delete!-:123456789012345. This is a standard SmartBackup name to identify a Workspace as an online backup Vault, where:
zz!~!-VAULT-do not delete!-is a hardcoded name to identify it as an online backup Vault.123456789012345is the generated Smartsheet ID for each User, and is available from the Members screen.
This way, even in sharable conditions, each User Vault will be easily identifiable by the embedded UserID.
When automatically creating online backup Vaults for each User a set of rules are applied:
- If a VaultID is already present, it is checked for validity and that it links to a Workspace with the standard name.
- If a VaultID is not present or is invalid, a scan is done to see if a Workspace with standard name exists, if so VaultID and links are updated respectively.
- If no vault Workspace can be found, a new online backup Vault with a standard name is created and a VaultID and links updated respectively.
When automatically deleting online backup Vaults for each User a set of rules are applied:
- If a VaultID is present, it is checked for validity and that it links to a Workspace with the standard name. If so, it will be removed and VaultID and links are removed.
- If VaultID is not present or is invalid, a scan is done to see if a Workspace with standard name exists, If so, it will be removed and VaultID and links are removed.
Running SmartBackup
SmartBackup was designed to run when required. Therefore, each application can run completely independently or in conjunction with other applications. The SmartBackup Administrator can select how and when to run each of the functions. The LiveCopy, ShadowCopy, Refreshmembers, and DRP Reporting functions run as executable applications, and can be invoked in various ways, as described below.
Note that it is possible to run multiple instances of each application or of various applications at the same time, without conflicting with each other. However, we strongly recommended scheduling each function to run in its own dedicated time slot to avoid any potential issues.
via the Console
SmartBackup can be controlled via the web user interface called the Console. To invoke the Console, double click on console.exe or click on the SmartBackup shortcut. After a short while a "SmartBackup Server Window" will appear, followed by the SmartBackup Console window. Both windows need to remain open while using the SmartBackup Console.
via the CMD Shell
If you're not familiar with the Command Prompt in Windows, officially called the Windows Command Processor and often abbreviated to CMD. It is the command line interface for Windows operating systems. A command line interface is a way of interacting with a computer directly using text commands.
There are a few ways to open the Command Prompt in Windows. Below are the most convenient:
- Type "
cmd" into the Start menu to search for it. Then click to invoke it - Press
Windows key + Rto open the Run box, then type "cmd" and hit Enter to open it - Or, using Windows Explorer, navigate to the apps directory where you have installed Smartbackup and then type CMD in top line which will open it.
Type cd followed by the path where you have installed the SmartBackup applications. Typically this location is the apps sub folder. cd c:\smartbackup\apps
Now you can invoke the LiveCopy function by typing livecopy.exe which will start running a LiveCopy job. Similarly, you can do the same with ShadowCopy, Refreshmembers, or DRP Reporting functions.
Each of these functions can be run with different settings, for example: livecopy.exe -s -d=30 will start the function and will create online backup copies of all sheets that were modified in last 30 days. The available settings for each function are shown in the Reference Guide.
via Task Scheduler
SmartBackup can be used with Windows Task Scheduler for scheduled automations.
This means if, for example, you want to run a LiveCopy job every Monday at 18h00, you will have to create a task within Task Scheduler to do that. Please refer to the Task Scheduler guide below on how to create scheduled tasks for SmartBackup.
📄 Download the Windows Task Scheduler Guide (PDF)You can also use the integrated Scheduling wizard in the SmartBackup Console (sub menu Schedule top right) to help define and manage tasks in Windows Task Scheduler.
via other Applications
Great scheduling flexibility exists since operations can also be invoked from other scheduling applications. You may perhaps have an Enterprise Job Scheduler or customized job operations applications. Typically, these applications offer facilities to invoke cmdline programs e.g. livecopy.exe -s -d=5
cd c:\smartbackup.
via PowerShell
PowerShell is specifically hghlighted since it is one of the most popular tools for system administrators. If your commands are embedded in a .bat file you can simply enter the command from PowerShell for example, cmd.exe /c "c:/path/mybat.bat".
SmartBackup RunBook Guide
As described in the SmartBackup Documentation, all SmartBackup functions can be invoked either directly using the SmartBackup Console, or programmatically by executing the individual applications using a Windows Command line interface or PowerShell, or they can be scheduled using Windows Task Scheduler or a similar scheduling tool.
However, we strongly recommend using “RunBook” batch files instead of invoking the application individually. Then, when combined with the new JobCentral application, it will be possible to create a sophisticated, fully customizable job management, monitoring, altering, and reporting solution directly in Smartsheet.
As outlined in the SmartBackup guides, it is highly recommended to create a set of RunBooks to efficiently manage scheduled SmartBackup functions.
By utilizing a RunBook approach instead of invoking individual SmartBackup functions directly, you gain greater control over task sequencing, allowing you to:
- Initialize tasks with specific parameters.
- Implement pre- and post-processing steps.
- Integrate customized notification methods suited to your needs as a SmartBackup administrator.
For SmartBackup tasks, we recommend creating several RunBooks, one for each function, and additional sets for multi-node deployments, in which case it will be possible to add a unique “node name” to each RunBook to make it easier to identify which node the function is running on
Then in each RunBook, add lines to invoke the jobcentral.exe application, which will pass all relevant job information to the JobCentral sheet in Smartsheet, for further analysis, reporting, notifications, etc.
Example RunBooks
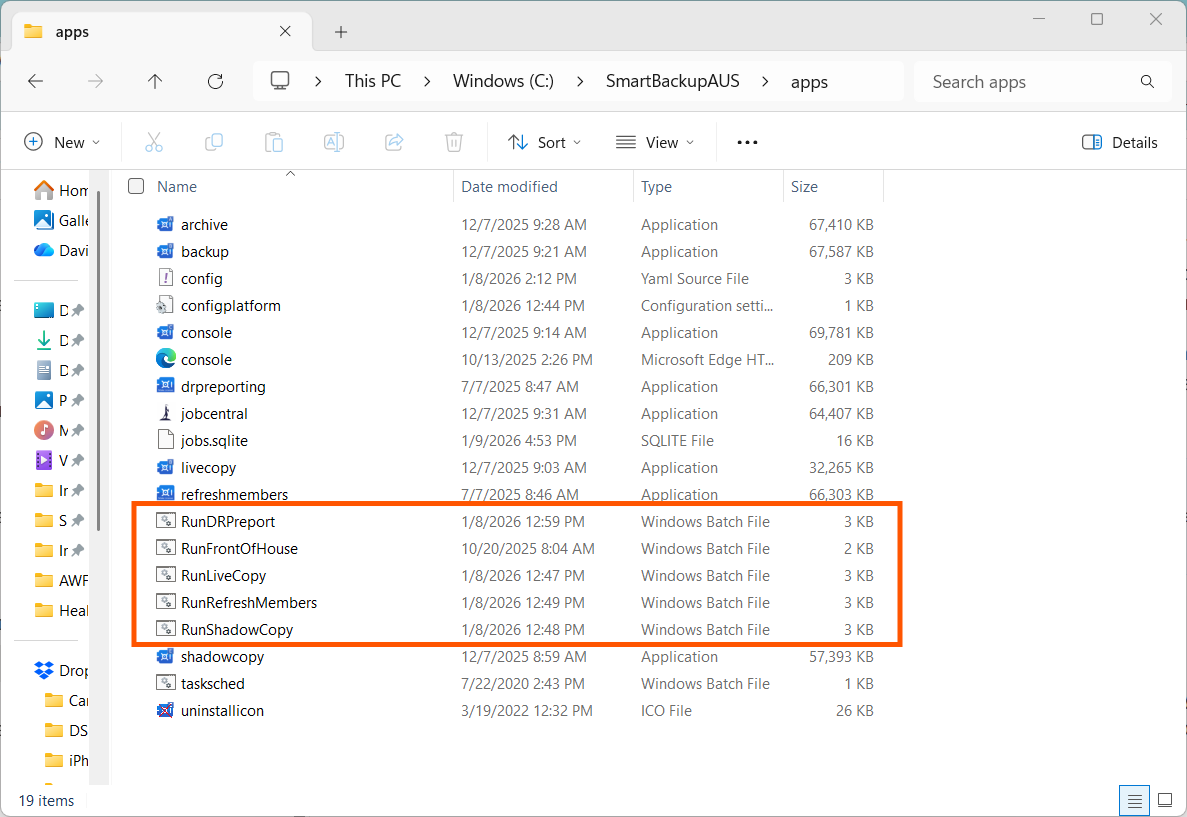
Once installed, you will be able to find the default example RunBooks for LiveCopy, ShadowCopy, Refreshmembers, and DRP Reports in the \apps\ sub-directory. By default, this location is: C:\SmartBackup\apps.
The following is a screenshot of a typical SmartBackup\apps installation folder as an example.
To better understand how these RunBooks work together with JobCentral to provide an overall monitoring and reporting solution for SmartBackup, it is necessary to take a look at the overall flow and coordination between the RunBooks, JobCentral and Smartsheet.
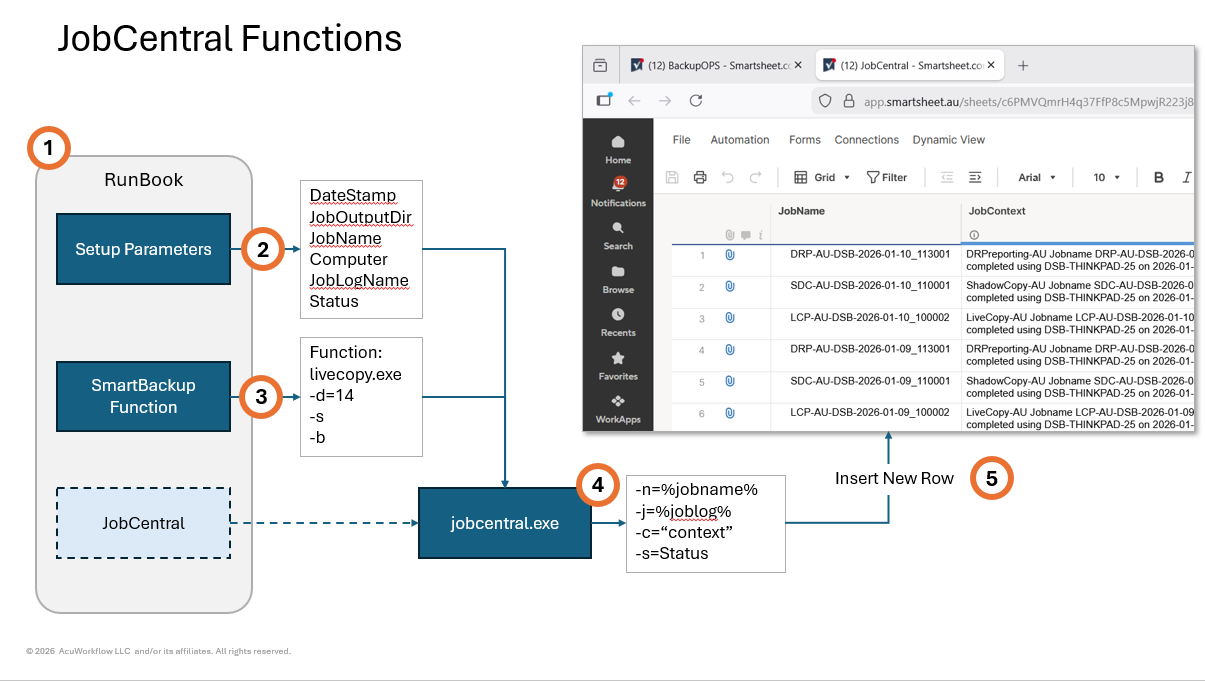
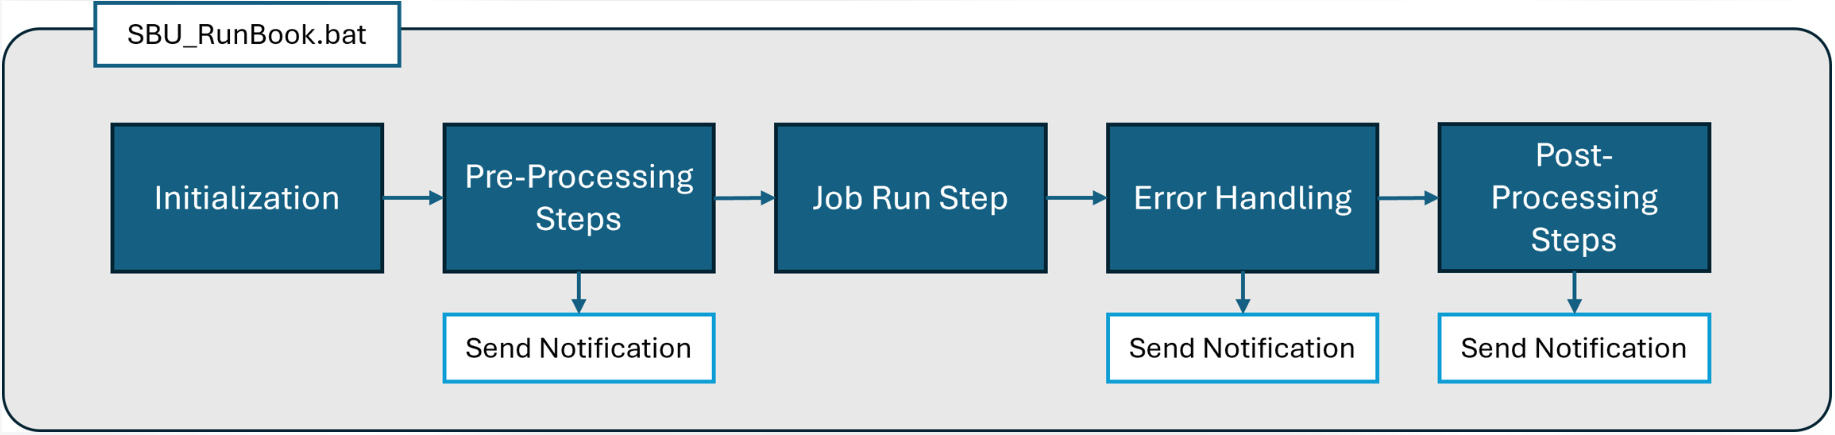
In the diagram above:
- The Admin will need to create or setup a set of RunBook batch files, one for each SmartBackup job function that needs to be scheduled and including LiveCopy, ShadowCopy, DRP Reports, and Refresh Members.
- Each RunBook will have an initialization section to define required parameters such as the Date/Time stamp, Job Name, Job Log Name and location, Computer name, Status, etc.
- Then in the Job Run section, the specific SmartBackup function is invoked, and function-specific options are provided, such as the number of days, or whether attachments are to be included, etc. These options will vary depending on the specific function being called.
- Then typically there will be an error checking step with two optional "paths", one for a successful run and one for when errors are detected. In both cases, the next step would invoke the jobcentral.exe function and will pass a set of parameters including the Jobname, Job log location, Job context, and the Job status.
- JobCentral will then take that information and insert a new row into the designated JobCentral Sheet in Smartsheet.
As the SmartBackup Admin, you have the ability to customize many of these parameters and settings and can "pass" your own unique job information through jobcentral.exe to be saved in the JobCentral Sheet.
Recommended acronyms for the SmartBackup functions include:
| Function | Acronym |
|---|---|
| LiveCopy | LCP |
| ShadowCopy | SDC |
| Refreshmembers | RFM |
| DRP Reporting | DRP |
For reference purposes and to make it easier to create your own set of customized RunBooks, you can download a set of default RunBooks for SmartBackup, in a zip file here:
📄 Download the RunBook Examples (ZIP)Using the Console
HOME Screen
Invoke SmartBackup by clicking on the desktop shortcut or double click console.exe in the \apps folder. The following browser view will be shown after a slight delay by the Console Server. On day zero, a warning will be displayed, and all values will be unpredictable until the first backup run has been completed
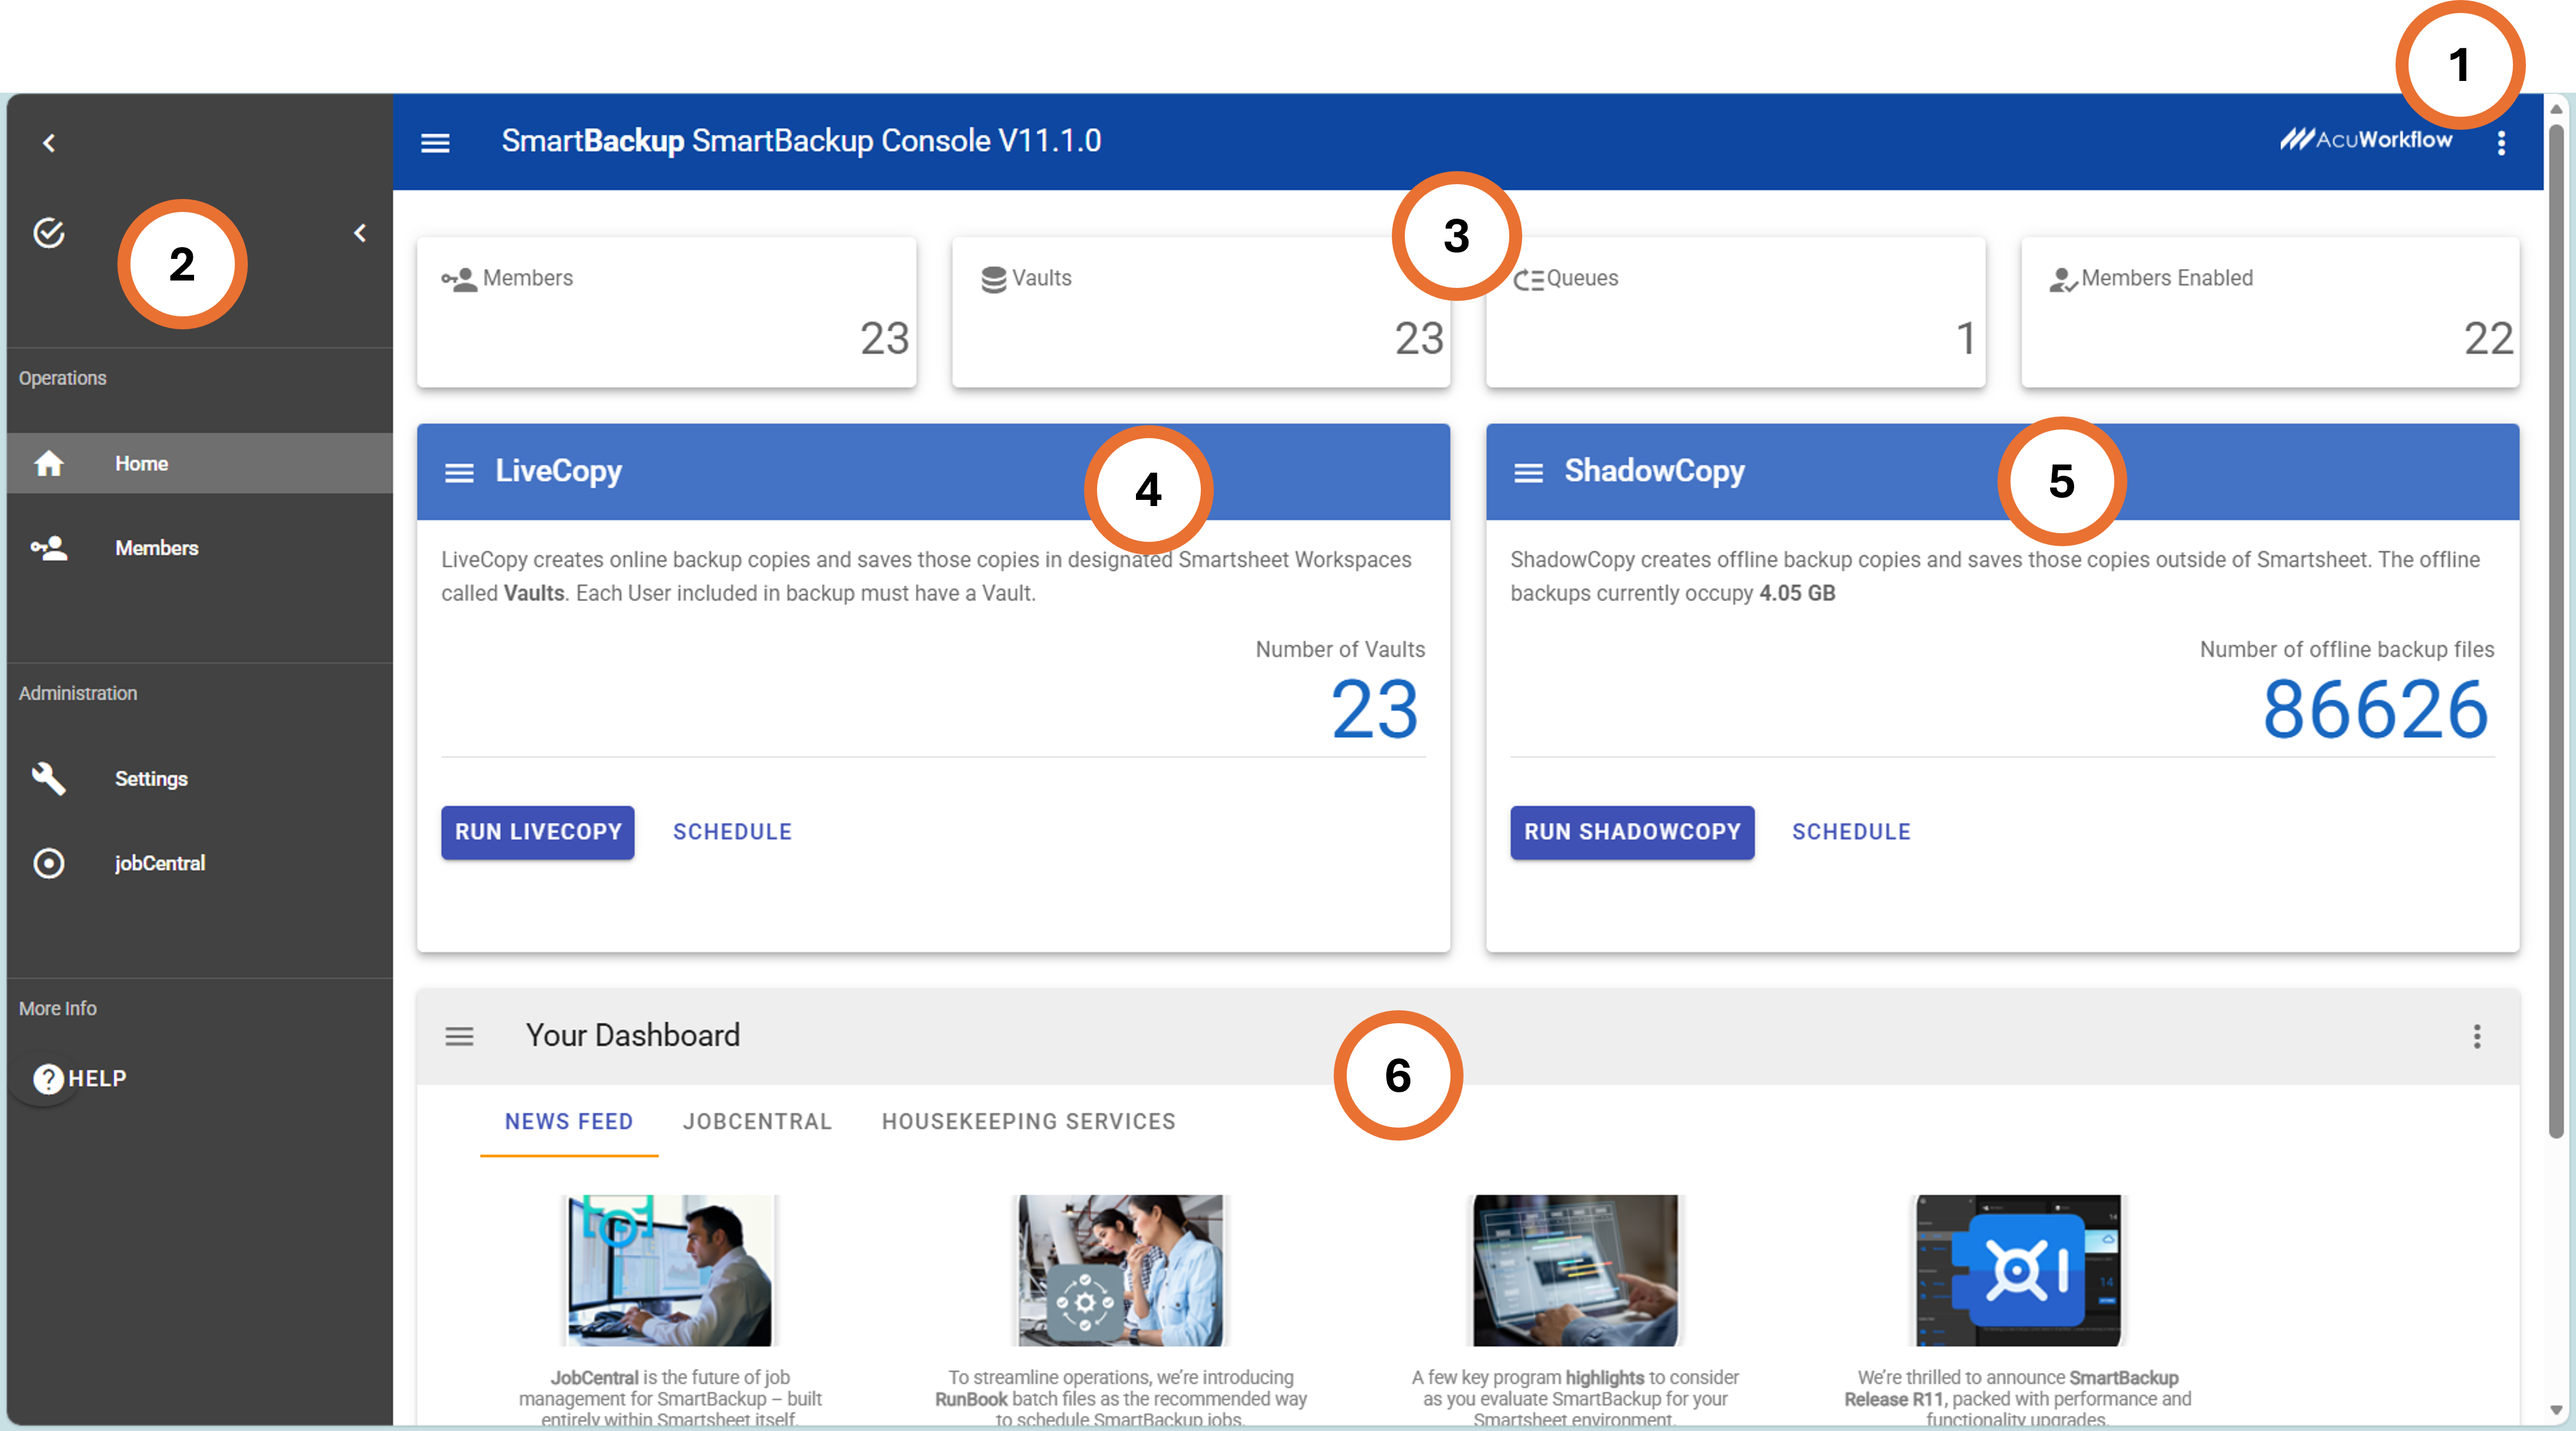
- Sub menu - Click to view sub menu actions such as Stopping the Console Server. It is a good practice to stop the Console Server when finished
- Main Menu - Show the primary activities grouped under Operations and Administration.
- SmartBackup Summary - this section displays several key SmartBackup status indicators and metrics, such as the number of Members and Vaults, and the number of Queues.
- LiveCopy Area - This area shows a summary of the number of member vaults currently defined in SmartBackup, together with the ability to run LiveCopy on demand.
- ShadowCopy Area - This area shows a summary of the number of offline copies that have been saved using the ShadowCopy function, together with an estimate of the amount of disk space currently being consumed by those offline copies. It also provides an option to run ShadowCopy on demand.
- SmartBackup News - The News section is where you can find the latest news about SmartBackup, including new release information. This section can also be used to find JobCentral information and Housekeeping Services schedules.
Members View
The Members view provides a list of all the Smartsheet Members that are currently defined, and which will be used to run all SmartBackup functions.
This view is also where the SmartBackup Admin will capture and save the Smartsheet sysAdmin Token. This token must be a System Administrator generated token and will be used to run all SmartBackup operations on behalf of all users in the organization.
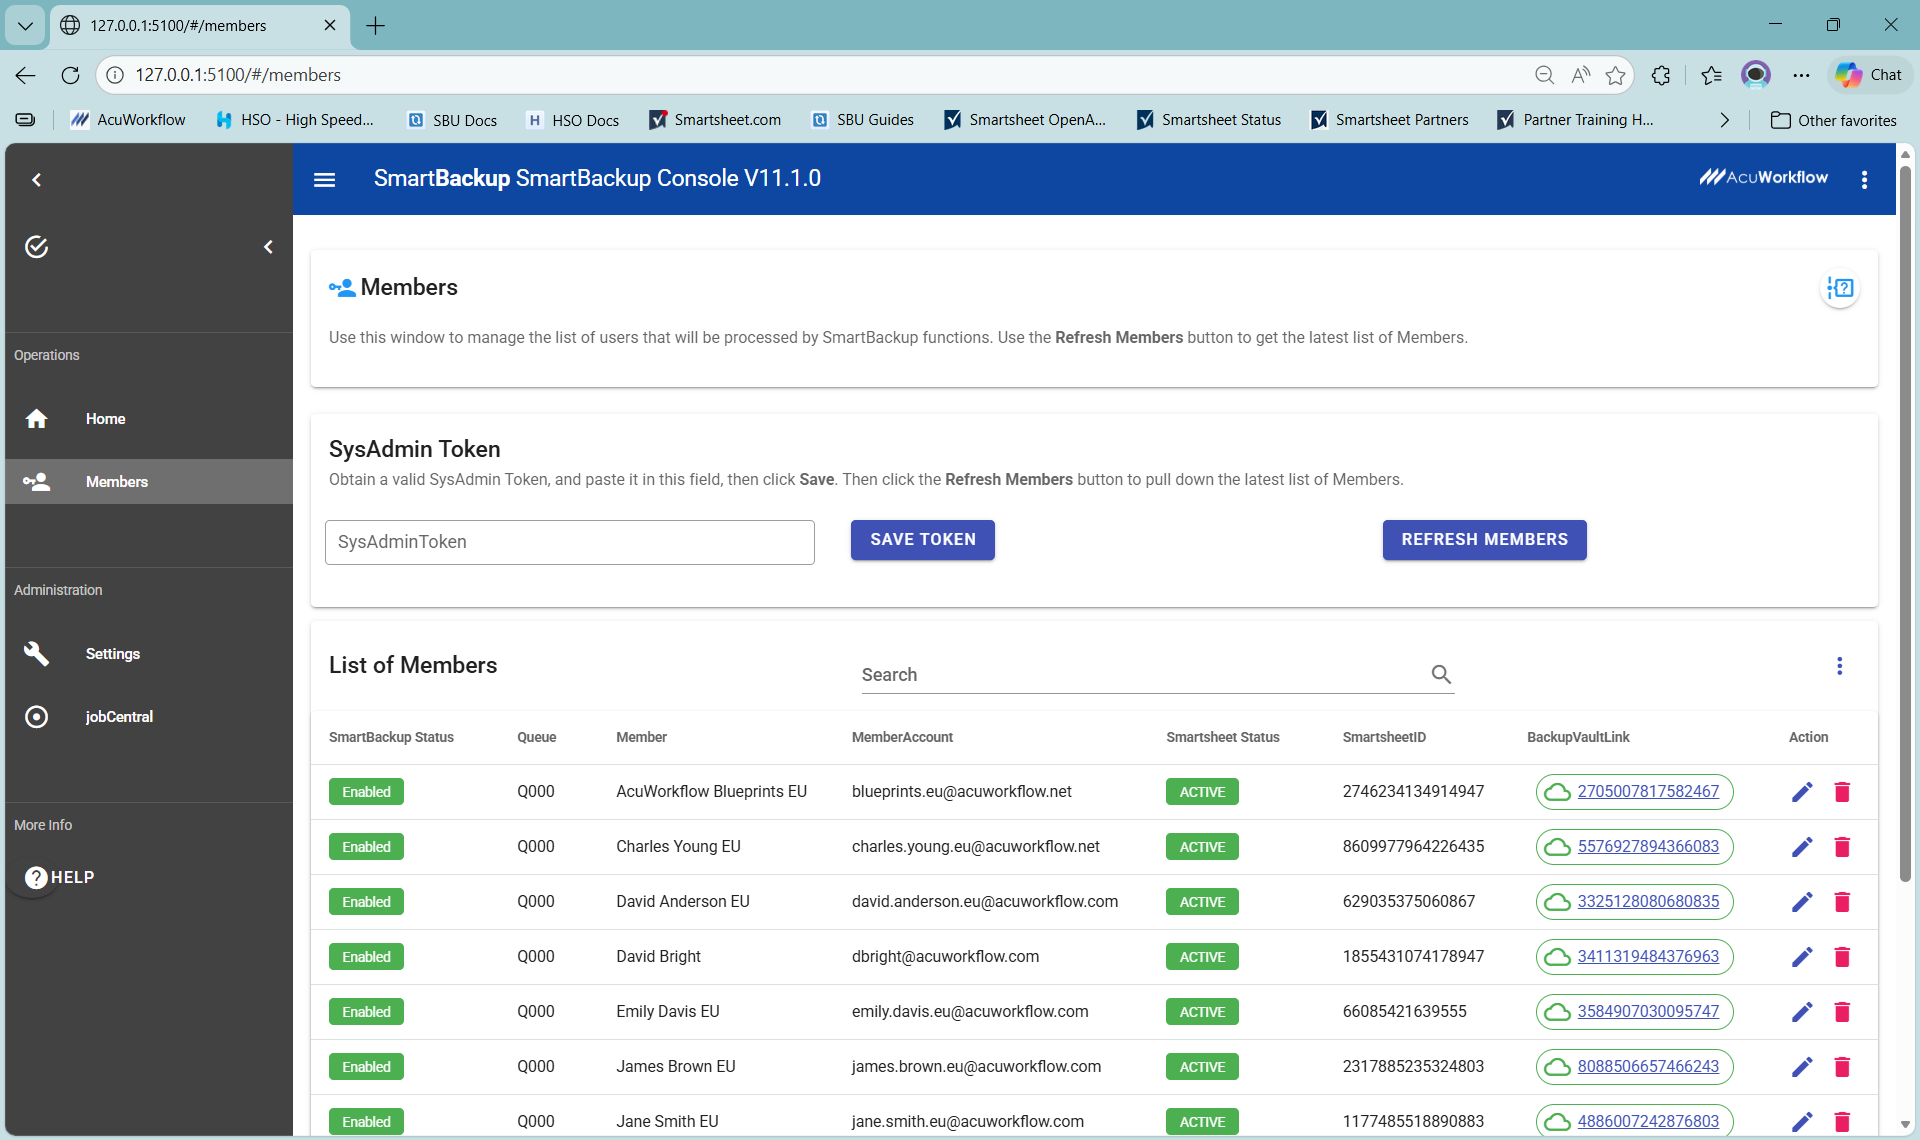
Once a valid sysAdmin Token has been captured and saved, click the Refresh Now button to pull down that latest list of Smartsheet Members. Note that depending on the overall number of members in the organization, this process could take a few seconds to a few minutes to complete.
You can use the Refresh Now button at any time to download a new copy of the member list from Smartsheet. You can also use the new refreshnow.exe function programmatically, via the CMD window, via Windows Task Scheduler, or via a RunBook batch file to refresh the member list on demand.
In the members screen, you will find several columns of information relating to the status of each user. These include the SmartBackup Status, Queue name, Member name, member email address, Smartsheet Status, Smartsheet User ID, and the BackupVaultLink, together with two action buttons.
The first "Action" button is used to edit an entry, while the second "Action" button is used to Delete an entry
In the center of the "List of Members" section, you will find a bulk update button called "Actions". The Actions button allows you to either Disable or Enable all members with a single click.
It is important to note that when any SmartBackup function runs, it will go through this member list sequentially from top to bottom, but it will only process members with the SmartBackup Status = "Enabled", and the Smartsheet Status = "Active". For all other status combinations, those members will be bypassed.
Task Scheduler
SmartBackup can be invoked using indows Task Scheduler for scheduled automations.
Please see Task Scheduler guide below on how to create scheduled tasks for SmartBackup.
📄 Download the Windows Task Scheduler Guide (PDF)